
If you are frequently sending mails to the same people all the time, you might be facing difficulty in typing each person’s email id in the “To” field every time you send a mail. To avoid repeatedly typing each email address, you can create a contact group and start sending emails using it in the “To” field. To create a contact group in outlook 2010, follow the given steps.
If you want to add mail box in Outlook then follow this blog-How to Add a Mailbox to Outlook 2010
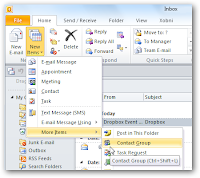
Step1: Open Microsoft Outlook. Under the Home tab, select “New Items” >“More Items” and then click “Contact Group”.
Step2: Now a “Contact Group” window appears on the screen. In this window, enter a name for your group. Under the Members group, click “Add Members” and then choose “From Outlook Contacts” or “From Address Book”.
Step3: When “Select Members” window will appears on the screen, select the contacts that you want to add to your contact group and then click the “Members Tab” at the left bottom corner of the window. Click the “OK” button.
Step4: If you want to add some a new contact to your group, just click “Add Member” in the Contact Group window and then enter the Display name of the contact and the E-mail address. Check the box “Add to Contacts” and then click “Ok”.
Step5: After adding all the contacts in the contact group, click the “Save and Close” button.
Step6: Now you can start composing your mail. Just enter the name of your Contact group in the “To” field and the mail will be sent to all the persons who are included in the contact group.
Step7: If you want to make sure that you have everyone included in the group, click on the plus (+) icon to expand the contacts. Then the members of the group will appear in the” To” field. Of course you can enter a Contact Group into the CC or Bcc fields as well.
Step8: After expanding the Contact Group, if you find any contact missing or if you want to remove a contact, just click on the “To” field itself and a window appears where you will see your Contact Group’s name. Right-click your Contact Group name and select “properties” and from there you can remove or add contacts to your Contact group.
Step9: You can also remove a member from “Remove Member” in the “Members” category. Click the “Save and Close” button. By this way you can manage your contact group.
Note:If you want to get more help on Microsoft outlook ,you can reach online technical support service desk of V tech-squad at their Toll Free No +1-877-452-9201.
See also:Microsoft Outlook 2010 is not responding
If you want to add mail box in Outlook then follow this blog-How to Add a Mailbox to Outlook 2010
Step1: Open Microsoft Outlook. Under the Home tab, select “New Items” >“More Items” and then click “Contact Group”.

Step2: Now a “Contact Group” window appears on the screen. In this window, enter a name for your group. Under the Members group, click “Add Members” and then choose “From Outlook Contacts” or “From Address Book”.
Step3: When “Select Members” window will appears on the screen, select the contacts that you want to add to your contact group and then click the “Members Tab” at the left bottom corner of the window. Click the “OK” button.
Step4: If you want to add some a new contact to your group, just click “Add Member” in the Contact Group window and then enter the Display name of the contact and the E-mail address. Check the box “Add to Contacts” and then click “Ok”.
Step5: After adding all the contacts in the contact group, click the “Save and Close” button.
Step6: Now you can start composing your mail. Just enter the name of your Contact group in the “To” field and the mail will be sent to all the persons who are included in the contact group.
Step7: If you want to make sure that you have everyone included in the group, click on the plus (+) icon to expand the contacts. Then the members of the group will appear in the” To” field. Of course you can enter a Contact Group into the CC or Bcc fields as well.
Step8: After expanding the Contact Group, if you find any contact missing or if you want to remove a contact, just click on the “To” field itself and a window appears where you will see your Contact Group’s name. Right-click your Contact Group name and select “properties” and from there you can remove or add contacts to your Contact group.
Step9: You can also remove a member from “Remove Member” in the “Members” category. Click the “Save and Close” button. By this way you can manage your contact group.
Note:If you want to get more help on Microsoft outlook ,you can reach online technical support service desk of V tech-squad at their Toll Free No +1-877-452-9201.
See also:Microsoft Outlook 2010 is not responding
No comments:
Post a Comment